Month: March 2014

  • Tips on installing FreeSWITCH and FusionPBX in debian

    I’ve been testing out FreeSWITCH and FusionPBX. I found it non trivial to install in debian. Here are my tips for installing.

    1. Don’t bother with the install script. I found it to be broken. And when it breaks during install, it leaves you in a state that’s very hard to understand and fix. In the end it was easier to install FreeSWITCH by hand, get that working, to the extend that you can make inter extension calls, then proceed with the FusionPBX install.
    2.  Install FreeSWITCH by following the Quick Install Guide.
    3. Commit the entire FreeSWITCH configuration to git so its easy to roll back when you reinstall FusionPBX. Switch to a new branch before making further changes.
      cd /usr/local/freeswitch
            git init
            echo 'db/*' >> .gitignore
            echo 'log/*' >> .gitignore
            echo '.svn*' >> .gitignore
            git add -A
            git commit -m "Initial Commit"
            git checkout -b try1
      
    4. Get the latest version of FusionPBX from svn.
      cd /usr/src
               svn checkout http://fusionpbx.googlecode.com/svn/trunk/ fusionpbx
               cd fusionpbx
               cp -a fusionpbx /var/www/fusionpbx
      
    5. Create a fusionpbx site for apache and enable it. Note that this makes fusionpbx appear at the root of your site. Create file called fusionpbx in your /etc/apache2/sites-available directory and put the following in it:
            <VirtualHost *:80>
              ServerAdmin webmaster@localhost
              ServerName freepbx.example.com
              DocumentRoot /var/www/fusionpbx
              <Directory />
                      Options FollowSymLinks
                      AllowOverride None
              </Directory>
              <Directory /var/www/fusionpbx/>
                      Options Indexes FollowSymLinks MultiViews
                      AllowOverride None
                      Order allow,deny
                      allow from all
              </Directory>
              ScriptAlias /cgi-bin/ /usr/lib/cgi-bin/
              <Directory "/usr/lib/cgi-bin">
                      AllowOverride None
                      Options +ExecCGI -MultiViews +SymLinksIfOwnerMatch
                      Order allow,deny
                      Allow from all
              </Directory>
              ErrorLog /var/log/apache2/error.log
              # Possible values include: debug, info, notice, warn, error, crit,
              # alert, emerg.
              LogLevel debug
              CustomLog /var/log/apache2/access.log combined
          Alias /doc/ "/usr/share/doc/"
          <Directory "/usr/share/doc/">
              Options Indexes MultiViews FollowSymLinks
              AllowOverride None
              Order deny,allow
              Deny from all
              Allow from 127.0.0.0/255.0.0.0 ::1/128
          </Directory>
      </VirtualHost>
      

      Then enable the site with a2ensite fusionpbx/

    6. after installing FusionPBX, commit the entire configuration to git to make rolling back easier. Switch to a new branch before making further changes.
    7. set up a FQDN for the box running FreeSWITCH and FusionPBX
    8. use ACL to allow www-data to make changes to the /usr/share/freeswitch directory

    And after you install and you realise it didn’t quite go as planned

    1. Reset the postgresql database:
      root@fusionpbx: # su - postgres
      postgres@fusionpbx:~$ psql
      postgres=# drop database fusionpbx;
      postgres=# create database fusionpbx;
      postgres=# alter user fusionpbx with password 'XXXX';
      grant ALL PRIVILEGES ON DATABASE fusionpbx to fusionpbx;
      
    2. revert your FreeSWITCH configuration using git
    3. revert your FusionPBX configuration using git


  • Proxy Dashing Dashboard behind Apache with SSL

    I needed to allow access to my Dashing dashboard over ssl from the Internet.  I decided to proxy it behind Apache and get Apache to do all the SSL heavy lifting, mainly because I couldn’t work out if and how you could enable SSL within Dashing itself.
    It turned out to be quite simple to implement. I simply created a vhost configuration for my dashboard and enabled it in Apache.
    Create a file  called dashboard in /etc/apache2/sites-available/ with the following content:

    <VirtualHost *:80>
     ServerName dashboard.example.com
     Redirect permanent / https://dashboard.example.com/
    </VirtualHost>
    NameVirtualHost *:443
    <VirtualHost _default_:443>
     SSLEngine On
     SSLCertificateFile /etc/ssl/CAcert.cert.pem
     SSLCertificateKeyFile /etc/ssl/private/key.pem
     ServerAdmin webmaster@localhost
     ServerName dashboard.example.com
     ErrorLog "/var/log/apache2/dashboard-error_log"
     CustomLog "/var/log/apache2/dashboard-access_log" common
     <Proxy *>
       Order allow,deny
       Allow from all
     </Proxy>
     ProxyPass / http://mylocalserver.example.com:3030/
     ProxyPassReverse / http://mylocalserver.example.com:3030/
    </VirtualHost>

    Ensure the proxy modules are enabled:

    $ sudo a2enmod proxy
    Enabling module proxy.
    To activate the new configuration, you need to run:
    service apache2 restart
    $ sudo a2enmod proxy_http
    Enabling module proxy_http.
    To activate the new configuration, you need to run:
    service apache2 restart
    $

    Enable the new dashboard site:

    $ sudo a2ensite dashboard

    Check your configuration is working before restarting apache:

    $ sudo apachectl configtest
    Syntax OK
    $ sudo service apache2 restart
    [ ok ] Restarting web server: apache2 ... waiting .
    $

    Don’t forget to delegate your dashboard.example.com hostname to resolve to your apache server’s IP address.
    Now visit http://dashboard.example.com/name_of_your_dashboard. Your browser should automatically get redirected to https://dashboard.example.com/name_of_your_dashboard and you should see your dashboard.

  • 3D Printed Heated Towelrail Brackets

    3D Printed Heated Towelrail Brackets

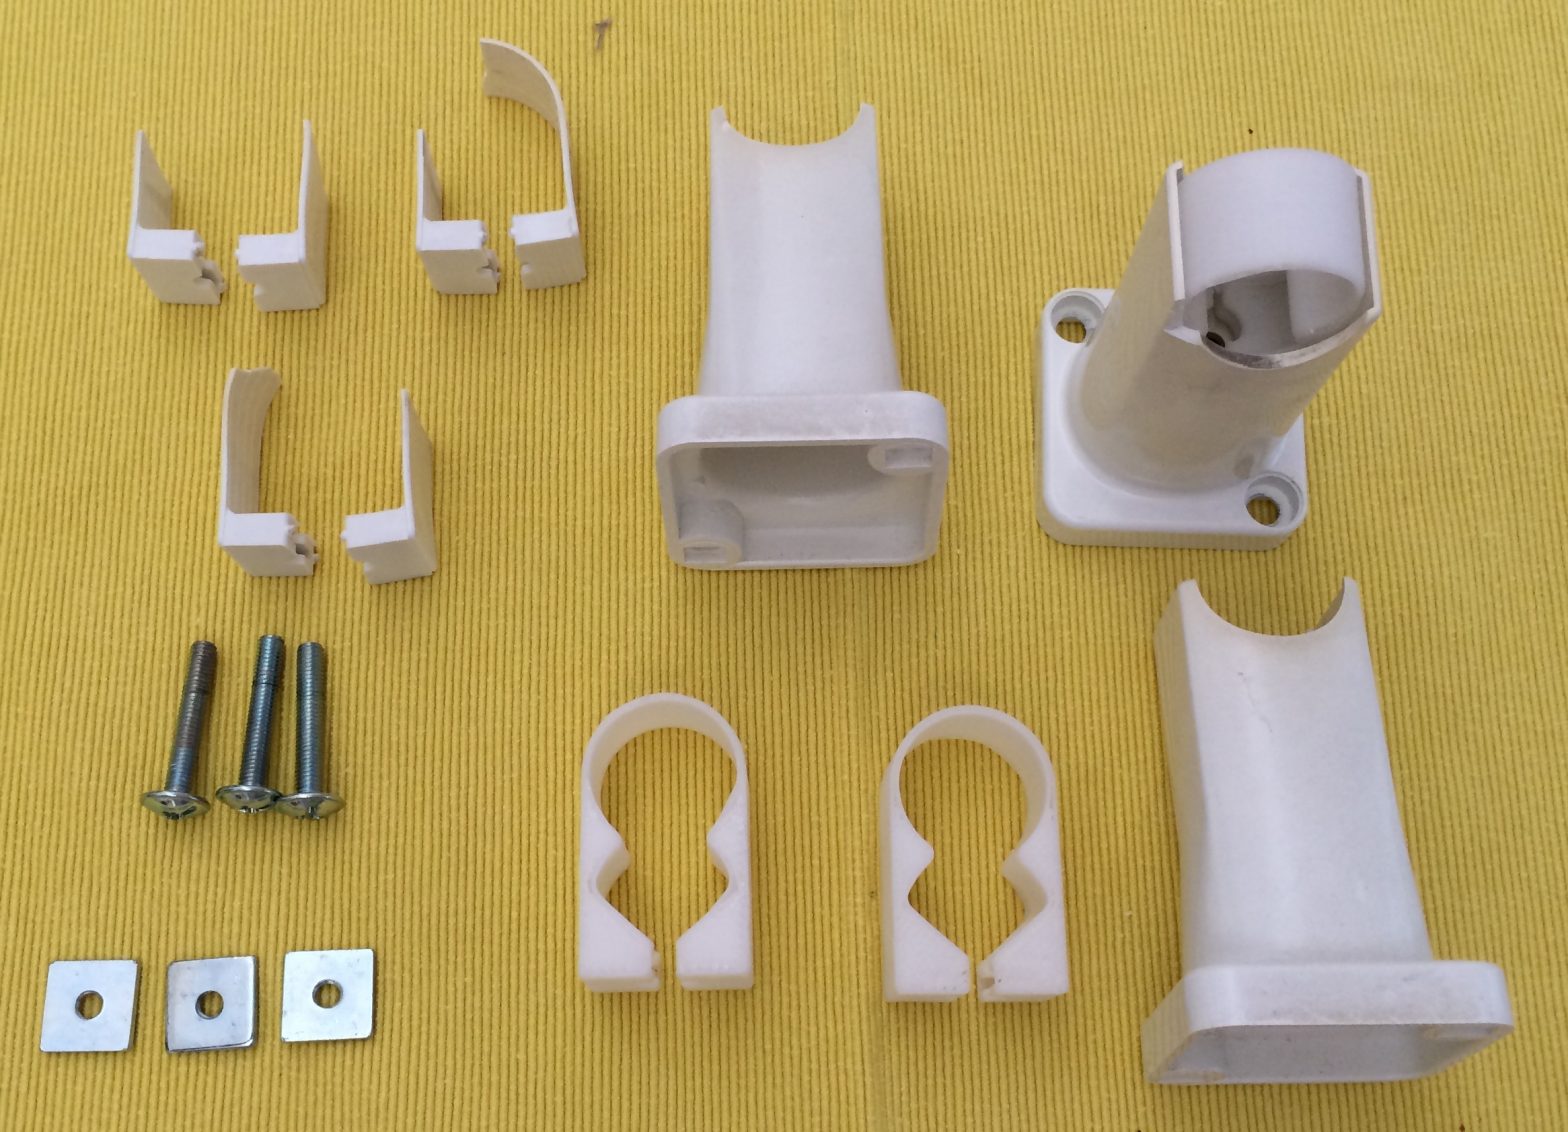
    Our heated towel rail’s brackets broke from old ages recently. After investigating getting a new towel rail and finding out they were quite expensive, I decided to try and design and 3D print new brackets for it.
    The first cut of the design turned out to have too little space for the nuts. A second draft with a little more space and it worked perfectly.
    The top left of the above image shows the broken parts and the bottom center shows 2 of the 3d printed replacement parts.
    3D Printed bracket holding the heated towelrail

    Update 2016-03-26

    Someone emailed me mentioning that their “Posh” heated towel rail had the same problem. A bit of googling around revealed a link a Goldair Towel Rail Bracket and Strap kit that looks like it contains the same straps as mine. This might help others find the relevant parts. Goldair have an Australian site too but it makes no mention of the strap kits.