Tag: debian

  • updating discord .deb one-liner

    Discord will often require you to install an update. When this happens it quits itself and auto downloads the latest .deb, but you end up with lots of sequentially numbered versions of the .deb so it’s fiddly to find and install the latest one.

    I came up with this approach to apt install the most recent one:

    sudo apt install \
       $(find /home/jason/Downloads/ \
           -name 'discord*.deb' -type f -printf '%T+ %p\n' | \
          sort -r | head -1 | cut -d' ' -f2)

    or you can build it into a bash function:

    update-discord()
    {
    sudo apt install \
      $(find /home/jason/Downloads/ -name 'discord*.deb' -type f -printf '%T+ %p\n' | \
      sort -r | head -1 | cut -d' ' -f2)
    }

    One could also consider deleting the .deb after successful install. That is an excercise left for the reader

    Free Palestine!

  • FreeTDS is a bag of razorblades use, Microsoft ODBC Driver for Linux instead

    According to @mst FreeTDS is a bag of razorblades.
    That’s right folks, don’t use it. The new way to go is Microsoft ODBC Driver for SQL Server on Linux.
    Unfortunately its a nightmare to install on debian. Luckily some very smart people wrote a lovely little howto: Install and Configure the MS ODBC Driver on Debian.

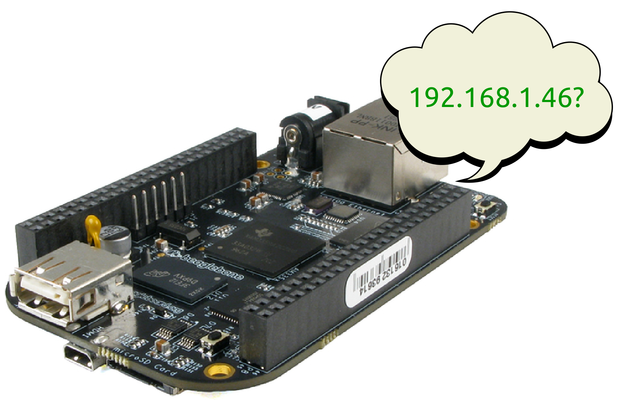
  • Howto quickly find your Beaglebone Black’s IP address

    Howto quickly find your Beaglebone Black’s IP address

    Whenever I connect my Beaglebone Black (BBB) to a network, I have to work out it’s IP address so I can ssh into it. This can be tricky. Some of your options are:

    1. connect to the serial terminal, or connect over the usb network interface which gives the BBB the address 192.168.7.2, log in and issue the command ip addr.
    2. use nmap to try and search out its IP address on your subnet but this is time consuming and not very accurate I have found.
    3. use avahi-browse -rat (thanks Madox for that tip.)

    Last night I came up with a Better Way™. Rather than trying to determine the BBB’s address, why not use a fully qualified domain name and a dynamic dns service? I could then just type ssh myfqdn.com or whatever and log in. Think how that would simplify one’s life!
    To implement this, set up a dynamic DNS somewhere with a FQDN for your BBB. If you happen to have your own domain name already you can use a sub-domain from that. I think its fairly common for DNS hosts to offer an API to update your IP address. I happen to use Rimu Hosting and they have their own simple web api.
    Then you just need to write a little script to update the IP address every time the DHCP client receives a new IP address, and drop it into /etc/dhcp/dhclient-exit-hooks.d/
    Here is my script. This will only work with Rimu Hosting as they have their own privately developed API, and you’d need to insert your own KEY into the script.

    #!/bin/bash
    # update ip address with rimu hosting. See https://rimuhosting.com/dns/dyndns.jsp
    if [[ ! -z ${new_ip_address} ]]
    then
       echo $(date +"%F %T") ${new_ip_address} >> /root/ddns.txt
       curl "https://rimuhosting.com/dns/dyndns.jsp?action=SET&name=clock.emacstragic.net&value=${new_ip_address}&type=A&api_key=XXX"
    else
        echo "got no ip"
    fi
    

    Update:

    I discovered this didn’t work at home. Turns out that dnsmasq in OpenWRT is set to ignore this kind of dns request, due to potential security risks. There is a solution to that. Add a list rebind_domain line to your /etc/config/dhcp line on the router.

    config dnsmasq
    	.
    	.
    	.
    	list    rebind_domain 'clock.emacstragic.net'
    

    Thanks to Michal Čihař for the solution to that.

  • Printing from Windows to a samba shared CUPS-PDF printer sometimes fails

    Printing from Windows to a samba shared CUPS-PDF printer sometimes fails

    I had this problem where prints to our CUPS-PDF printer sometimes failed to be processed on the server. The job would disappear as though it has been printed but nothing else would happen. Printing from the same application to a Windows based PDF printer, and then printing the resulting PDF via Adobe Acrobat to the CUPS PDF printer would work fine. Printing the same PDF via Sumatra PDF to CUPS-PDF would also fail.
    Further investigation revealed that the resulting print job files would differ. The jobs that fail looked like they contained a lot of binary data but the ones that succeeded looked like normal PDF files.
    Then I discovered this entry in the Windows Event Viewer:

    The document XXXX, owned by jason, failed to print on printer \\server\PDF. Try to print the document again, or restart the print spooler.
    Data type: NT EMF 1.008. Size of the spool file in bytes: 2555904. Number of bytes printed: 0. Total number of pages in the document: 1. Number of pages printed: 0. Client computer: \\CLIENT. Win32 error code returned by the print processor: 0. The operation completed successfully.

    Googleing that error took me to this RPi forum which had a solution buried down near the bottom. Thanks to Chemirocha for that tip. This bug has been plaguing me for a few years on and off!

  • automysqlbackup ERRORS REPORTED: MySQL Backup error Log Warning: Skipping the data of table mysql.event. Specify the –events option explicitly.

    automysqlbackup ERRORS REPORTED: MySQL Backup error Log Warning: Skipping the data of table mysql.event. Specify the –events option explicitly.

    I was receiving email error messages from cron like this from my autbackupmysql on a regular basis:
    ERRORS REPORTED: MySQL Backup error Log for somehost.com.dxa - 2014-05-01_06h26m
    -- Warning: Skipping the data of table mysql.event. Specify the --events option explicitly.

    It turns out that mysqldump now warns you if the events table is not being dumped. So to get rid of the warning either ensure the table gets dumped when you do a backup or tell mysql explicitly not to dump it. I chose the former approach as it is a backup after all.
    Simply add the following line to /etc/mysql/my.cnf

    [mysqldump]
    ...
    ...
    ...
    events

    This tells the mysqldump program to explicity include the events table, and removes the warning. You can see a discussion about this option here.
    If you are using debian, you will need to add that section to the /etc/mysql/debian.cnf file also as automysqlbackup uses that file for its configuration instead. See debian bug report for more details.

  • Tips on installing FreeSWITCH and FusionPBX in debian

    I’ve been testing out FreeSWITCH and FusionPBX. I found it non trivial to install in debian. Here are my tips for installing.

    1. Don’t bother with the install script. I found it to be broken. And when it breaks during install, it leaves you in a state that’s very hard to understand and fix. In the end it was easier to install FreeSWITCH by hand, get that working, to the extend that you can make inter extension calls, then proceed with the FusionPBX install.
    2.  Install FreeSWITCH by following the Quick Install Guide.
    3. Commit the entire FreeSWITCH configuration to git so its easy to roll back when you reinstall FusionPBX. Switch to a new branch before making further changes.
      cd /usr/local/freeswitch
            git init
            echo 'db/*' >> .gitignore
            echo 'log/*' >> .gitignore
            echo '.svn*' >> .gitignore
            git add -A
            git commit -m "Initial Commit"
            git checkout -b try1
      
    4. Get the latest version of FusionPBX from svn.
      cd /usr/src
               svn checkout http://fusionpbx.googlecode.com/svn/trunk/ fusionpbx
               cd fusionpbx
               cp -a fusionpbx /var/www/fusionpbx
      
    5. Create a fusionpbx site for apache and enable it. Note that this makes fusionpbx appear at the root of your site. Create file called fusionpbx in your /etc/apache2/sites-available directory and put the following in it:
            <VirtualHost *:80>
              ServerAdmin webmaster@localhost
              ServerName freepbx.example.com
              DocumentRoot /var/www/fusionpbx
              <Directory />
                      Options FollowSymLinks
                      AllowOverride None
              </Directory>
              <Directory /var/www/fusionpbx/>
                      Options Indexes FollowSymLinks MultiViews
                      AllowOverride None
                      Order allow,deny
                      allow from all
              </Directory>
              ScriptAlias /cgi-bin/ /usr/lib/cgi-bin/
              <Directory "/usr/lib/cgi-bin">
                      AllowOverride None
                      Options +ExecCGI -MultiViews +SymLinksIfOwnerMatch
                      Order allow,deny
                      Allow from all
              </Directory>
              ErrorLog /var/log/apache2/error.log
              # Possible values include: debug, info, notice, warn, error, crit,
              # alert, emerg.
              LogLevel debug
              CustomLog /var/log/apache2/access.log combined
          Alias /doc/ "/usr/share/doc/"
          <Directory "/usr/share/doc/">
              Options Indexes MultiViews FollowSymLinks
              AllowOverride None
              Order deny,allow
              Deny from all
              Allow from 127.0.0.0/255.0.0.0 ::1/128
          </Directory>
      </VirtualHost>
      

      Then enable the site with a2ensite fusionpbx/

    6. after installing FusionPBX, commit the entire configuration to git to make rolling back easier. Switch to a new branch before making further changes.
    7. set up a FQDN for the box running FreeSWITCH and FusionPBX
    8. use ACL to allow www-data to make changes to the /usr/share/freeswitch directory

    And after you install and you realise it didn’t quite go as planned

    1. Reset the postgresql database:
      root@fusionpbx: # su - postgres
      postgres@fusionpbx:~$ psql
      postgres=# drop database fusionpbx;
      postgres=# create database fusionpbx;
      postgres=# alter user fusionpbx with password 'XXXX';
      grant ALL PRIVILEGES ON DATABASE fusionpbx to fusionpbx;
      
    2. revert your FreeSWITCH configuration using git
    3. revert your FusionPBX configuration using git


  • Anacron run-parts: /etc/cron.daily/amavisd-new exited with return code 1

    I’ve been getting messages like the ones below from cron my debian box for some time now. I finally got sick of seeing them and I tracked down the error.
    /etc/cron.daily/amavisd-new:
    Please run this cronjob as user amavis
    run-parts: /etc/cron.daily/amavisd-new exited with return code 1

    At some point the debian package moved the cron config file from /etc/cron.daily/amavisd-new to /etc/cron.d/amavisd-new but for some reason when upgrading, it does not remove the old config file, leaving you with an erroneous file.
    All you need to do is delete /etc/cron.daily/amavisd-new and the messages should go away.

  • How to make a bootable usb stick in Windows 7 of a debian iso

    Every so often I need to make a bootable USB stick in Windows 7 (64 bit) of a debian installer iso. For some reason my googling usually does not reveal a simple solution for this.
    I asked on #debian on the OFTC network and got various suggestions. The first suggestions were to use win32 compiled variants of dd or rawwrite. The problem is that there seems to be multiple versions of these tools out there and the ones I tried all seemed to have issues of one sort or another, mostly to do with dd complaining that it would not run on 64 bit Windows. My other issue is that they are command line based. Not that I mind using the command line but it does feel fiddly when all you want to do is get on with writing the image to the USB stick so you can install Debian.
    Next I came up with unetbootin. This looks promising and seems to work but it does some very strange rewriting of the boot menus you get on the resulting USB stick. I was confused by the menus when I first saw it and I’m sure novice users would have no idea what to do.
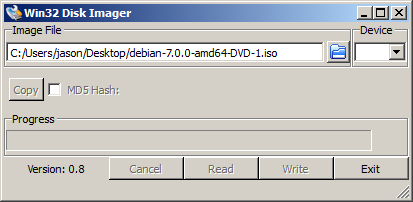
    Finally dvs on #debian suggested win32diskimager. This is exactly what I wanted. A point and click solution.

    screenshot of win32diskimager
    screenshot of win32diskimager

    Select the DVD image you want. If the file’s extension is .iso you’ll need to change the filter from *.img;*.IMG to *.* in order to see the file. Then select the Device you want to write to. Hit Write and go and have a cup of tea while it writes the ISO to the USB stick.

  • Project Euler No. 1 in Emacs elisp

    My first Project Euler solution, and my first emacs elisp program.
    Multiples of 3 and 5.
    If we list all the natural numbers below 10 that are multiples of 3 or 5, we get 3, 5, 6 and 9. The sum of these multiples is 23.
    Find the sum of all the multiples of 3 or 5 below 1000.
    My solution:

      (defun divisibleby (dividend divisor)
        "check if dividend is divisible by divisor"
        (if (not(integerp dividend))
            (error "dividend must be an integer"))
        (if (not(integerp divisor))
            (error "divisor must be an integer"))
        (zerop (mod dividend divisor))
        )
    (let  ((lower 1)
           (upper 1000)
           (sum 0))
      (loop for i from lower to (- upper 1) do (if (or (divisibleby i 3)
                                                  (divisibleby i 5))
                                             (setq sum (+ sum i)))
            )
      (message "sum is: %d" sum)
      )
    
  • Error: GDBus.Error:org.freedesktop.DBus.Error.Spawn.ExecFailed: Failed to execute program /usr/lib/dbus-1.0/dbus-daemon-launch-helper: Success

    I recently migrated my linux box from bare metal hardware to a VMware virtual machine. At the same time, I upgraded from Debian squeeze to Debian Wheezy (testing).
    After the dust had settled, one nagging problem keep recurring. Every time I did an aptitude update or aptitude install, after everything successfully ran, I would get this error message:
    Error: GDBus.Error:org.freedesktop.DBus.Error.Spawn.ExecFailed: Failed to execute program /usr/lib/dbus-1.0/dbus-daemon-launch-helper: Success
    The cause of this proved quite difficult to track down. Eventually a Gentoo forum post led me to the solution. It seems that somewhere along the line, dbus-daemon-launch-helper has ended up with the wrong permissions. Change its permissions to be world executable.
    chmod o+x /usr/lib/dbus-1.0/dbus-daemon-launch-helper