I was receiving email error messages from cron like this from my autbackupmysql on a regular basis:
ERRORS REPORTED: MySQL Backup error Log for somehost.com.dxa - 2014-05-01_06h26m

-- Warning: Skipping the data of table mysql.event. Specify the --events option explicitly.
It turns out that mysqldump now warns you if the events table is not being dumped. So to get rid of the warning either ensure the table gets dumped when you do a backup or tell mysql explicitly not to dump it. I chose the former approach as it is a backup after all.
Simply add the following line to /etc/mysql/my.cnf
[mysqldump]

...

...

...

events
This tells the mysqldump program to explicity include the events table, and removes the warning. You can see a discussion about this option here.
If you are using debian, you will need to add that section to the /etc/mysql/debian.cnf file also as automysqlbackup uses that file for its configuration instead. See debian bug report for more details.
Category: Uncategorized
-

automysqlbackup ERRORS REPORTED: MySQL Backup error Log Warning: Skipping the data of table mysql.event. Specify the –events option explicitly.
-
increase wordpress Maximum upload file size beyond 8MB.
There is at least three places you need to set the maximum upload file size in WordPress.
First check your php.ini
upload_max_filesize = 64M;

post_max_size = 64M;
Restart Apache after making this change.
Then if you are using WordPress multi-site, you need change a setting in the backend. Visit My Sites -> Network Admin -> Dashboard -> Settings -> Network Settings. Then scroll down to the Upload Settings area and change that.
Thanks to dorr13 for that tip. -
How to create debian init.d startup script
From time to time I need to create an init.d startup script for a program that is not part of the default debian distribution. I’ve always found it unnecessarily fiddly to create a new script. The other day I came across naholyr’s gist, a script to make init.d scripts.
There were a few problems with it so I made it into a proper github project and fixed up the problems. The url it was retrieving the service.sh script from was 404, and it wasn’t checking for successful download of the script, so I made it abort if it fails to download.
I couldn’t come up with a decent name for it so its called sample-service-script.
I already had a few pull request to it, yay! -
How to factory reset a Yealink phone
If you ever need to do a factory reset on a Yealink phone, maybe if you forgot the admin password, simply hold the OK key down for 10 seconds and follow the prompts.
Thanks to Langineers for that tip. -
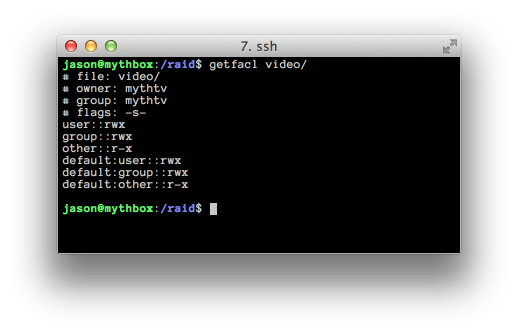
Set group permissions for whole subdirectory with ACLs
Sometimes you want to preserve file permissions under subdirectories in linux with ACLs but that’s not the whole story. If you want multiple users to be able to read and write to these files, and the group permissions to stay correct, you need to set ACLs and also group +s on the subdirectories. This is to ensure new files and directories are also created with the correct permissions and group ownership.
I wrote a small script that takes a group and a directory as parameters, and recursively fixes the permissions and set new ACL and group permissions so in future, new files will have the correct permissions.
I put set-acl-permissions on github.
It blindly recursively sets permissions so be careful. Also, it may well contain bugs that could cause catastrophic failures. -
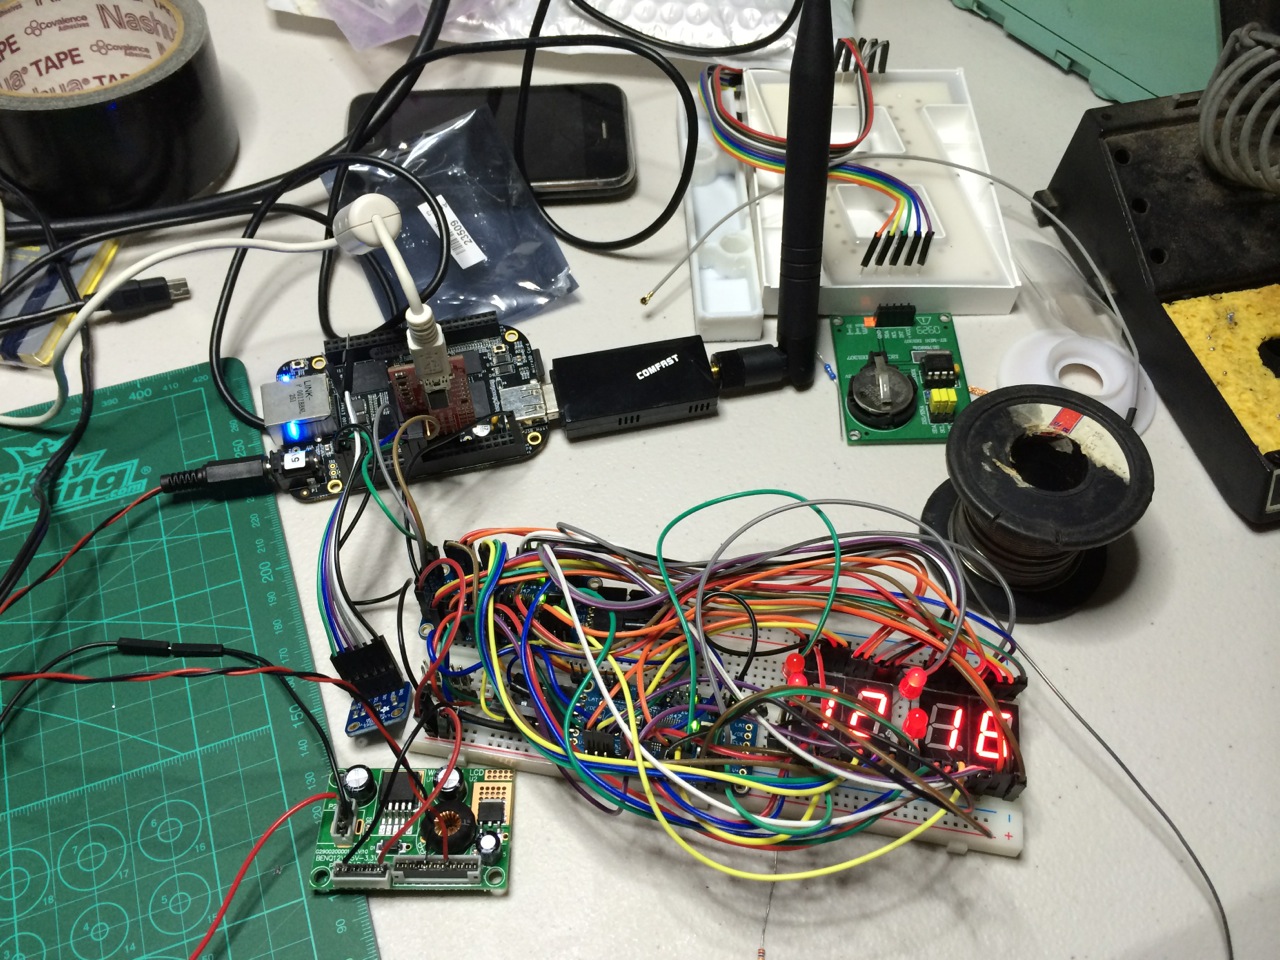
LED Clock Project
For a long time I have wanted a bedside clock that would keep accurate time via some external mechanism, and would take care of daylight savings automatically. I eventually decided that the best approach would be to use a wifi enabled device and use the NTP protocol for keeping the time accurate.
After wasting several months hacking away on an Olimex IMX 233 that never worked reliably, I decided to change platform to the Beaglebone Black (BBB).
Along the way I realised there were a few other features I needed:- LEDs should dim with the ambient light so the clock doesn’t light up the whole bedroom
- The display needs to be big enough for me to read from across the bedroom without my glasses on.
To make them dimmable I decided to get a pair of
I also needed a power supply that could give 12v for the LED drivers but 5v for the BBB. I found a nice little board on ebay for a few bucks that seems to do the trick. Its called the Benq 12v-5v-3.3v
I hooked that up tonight so now I only need the one power supply to run the LEDs and the BBB.
-
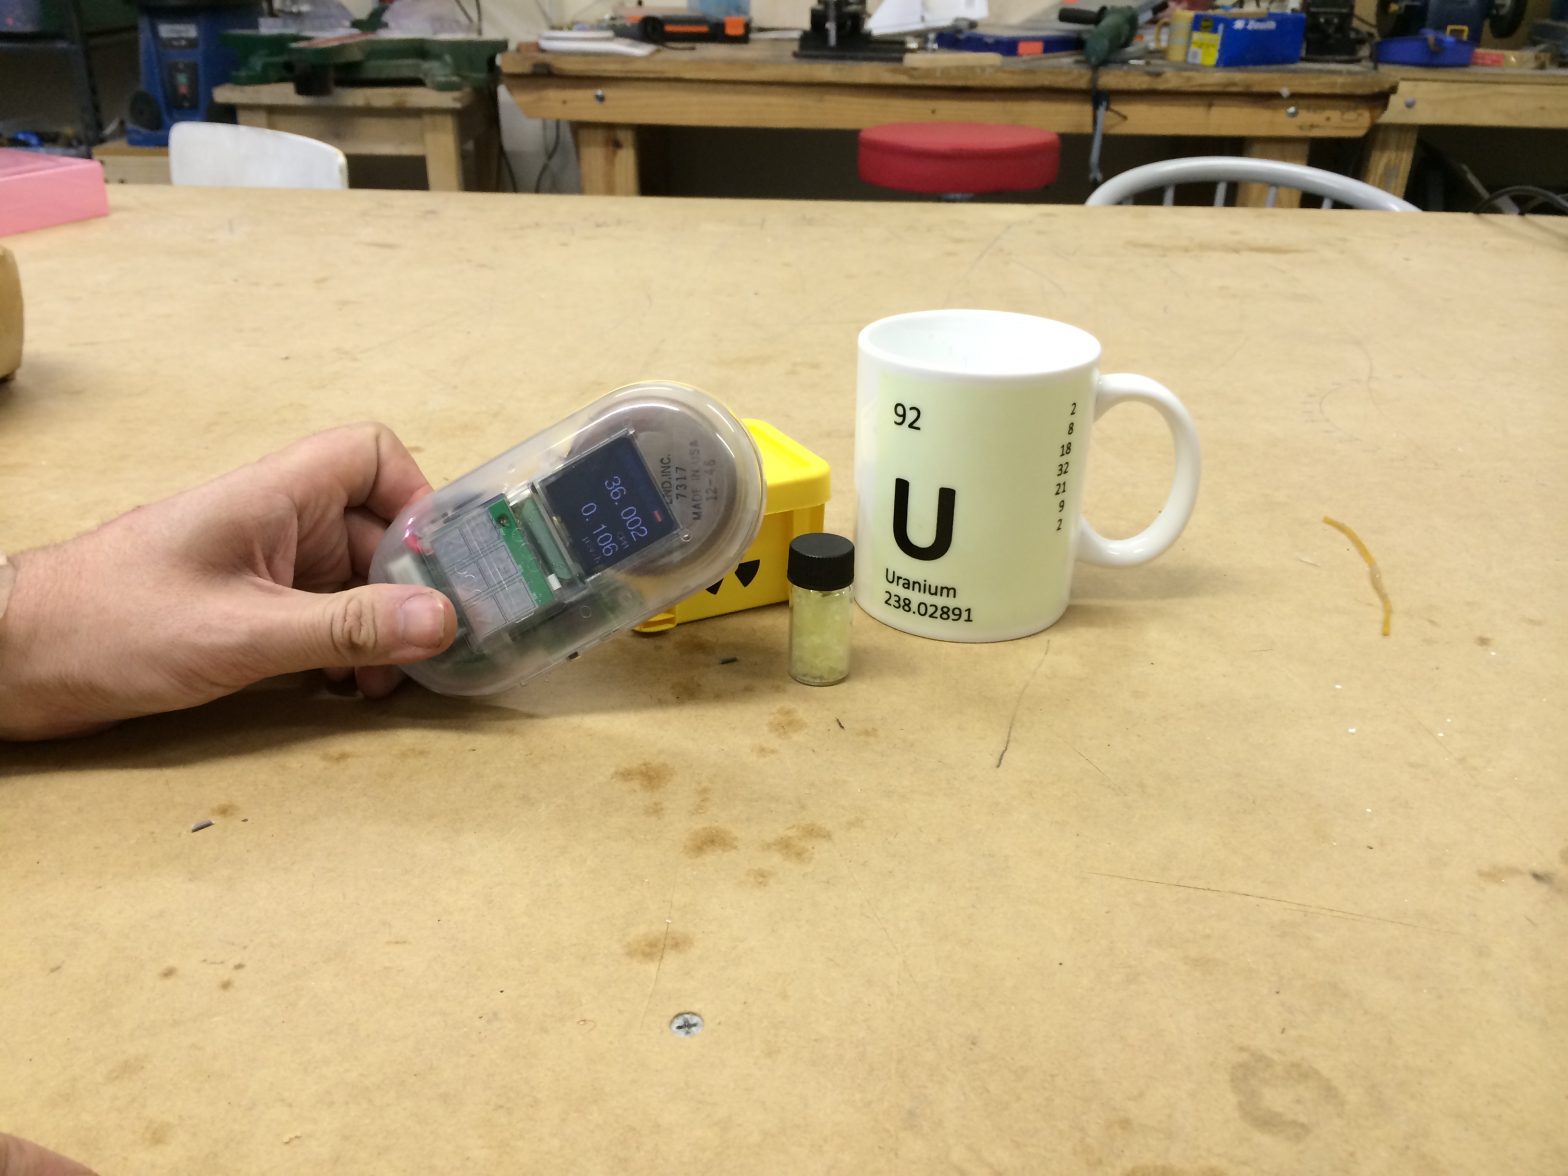
My uranium mug is not radioactive
A while ago I broke my favourite mug. After a long and difficult search I found a new mug. A mug with the periodic table of elements entry for uranium on it. It also glows in the dark. Gav from the hacker space has a Geiger counter so I took the opportunity to measure the radioactivity of my mug. Luckily it’s not radioactive at all. Only 0.106μSv/h (micro Sieverts per hour).
-
Pull a backup from a remote host with ssh and tar
Sometimes you might need to copy a whole directory from a remote host, but the remote host does not have enough space to tar the whole thing up and then sftp it off. The solution is to tar/bzip the directory and stream it directly to your local host:
ssh root@remotehost 'tar cjf - /path/to/somedirectory' | pv -cN tar > somedirectory.tar.bz2
Using pv (pipe viewer) gives you extra progress bar goodness:
tar: 176MB 0:09:14 [ 371kB/s] [ <=> ]
-

HP MediaSmart IR Remote for MythTV
I’ve been on a quest to find a good remote for MythTV. My first try was with a Logitech Harmony. Those things are nasty horrible pieces of crap. I’d never touch one again. Programming it is a nightmare. It does not have a generic PVR option so you have to fake it to make it work with Mythtv by telling it its another device and learning those codes in LIRC. It is a very slow device with what felt like a 500ms delay with each keypress. It also tried to know what state your equipment was in so that it could turn things on and off, but of course it would always be out of sync and then you’d have to go through this process of turning things on and off until it was in sync again.
Enter the HP MediaSmart IR remote, also known as HP RC2285202/01. These devices used come with a media player box that HP used to sell. As far as I can tell, its not in production anymore but the remotes are readily available on Ebay.
Features:- Dedicated IR codes for the PVR. On previous universal remotes I have used, I was unable to find a “code” setting that would make all the buttons active, that I could then learn in LIRC.
- Back-lit keys. All the keys seem to be backlit. Some universal remotes either only backlight a few keys or have no backlight at all.
- Cheap. A$23 with USB receiver, delivered.
- Universal remote. Can control 5 devices including your PVR.
- Punch Through. Some buttons like volume and mute can punch through from the TV or Amp, to the PVR device. IE. you can make it turn the volume up on the amp when you press the volume button when in PVR or TV modes.
- Takes standard AA batteries.
There are a few downsides too:
- Difficult to get going (solved now that you have found this blog post)
- Punch through does not work on all buttons. Namely Power and Source. This is annoying but solvable with a pulse-eight CEC adapter
I spent many hours trying to work out why it would not work on my system. In the end it came down to two things.
For some reason LIRC does not work correctly with MCEUSB receivers that are plugged into USB3 sockets.
You need to tell the kernel to treat the receiver as lirc rather than anything else, in order for LIRC to be able to connect to it:$ sudo sh -c "echo lirc > /sys/class/rc/rc6/protocols" $ sudo cat /sys/class/rc/rc6/protocols rc-5 nec rc-6 jvc sony mce_kbd [lirc]
The word [lirc] surrounded with square brackets tells you it worked.
I implemented this at boot time by adding/etc/rc-scripts/start-lirc
to /etc/rc.local and then in /etc/rc-scripts/start-lirc
#!/bin/bash
echo "Making lirc the default for rc"
echo lirc > /sys/class/rc/rc0/protocols
echo "Starting lircd"
/etc/init.d/lirc start
Remove lirc from the normal startup process:
$ sudo update-rc.d lirc remove
Test your configuration (retrieve HP-RC2285301-01.conf below):
$ sudo /usr/sbin/lircd -n -d /dev/lirc0 -P ./lirc.pid  HP-RC2285201-01.conf
$ irw
And when you press the keys on your remote, you should see some output from irw.
-
Tips on installing FreeSWITCH and FusionPBX in debian
I’ve been testing out FreeSWITCH and FusionPBX. I found it non trivial to install in debian. Here are my tips for installing.
- Don’t bother with the install script. I found it to be broken. And when it breaks during install, it leaves you in a state that’s very hard to understand and fix. In the end it was easier to install FreeSWITCH by hand, get that working, to the extend that you can make inter extension calls, then proceed with the FusionPBX install.
- Install FreeSWITCH by following the Quick Install Guide.
- Commit the entire FreeSWITCH configuration to git so its easy to roll back when you reinstall FusionPBX. Switch to a new branch before making further changes.
cd /usr/local/freeswitch git init echo 'db/*' >> .gitignore echo 'log/*' >> .gitignore echo '.svn*' >> .gitignore git add -A git commit -m "Initial Commit" git checkout -b try1 - Get the latest version of FusionPBX from svn.
cd /usr/src svn checkout http://fusionpbx.googlecode.com/svn/trunk/ fusionpbx cd fusionpbx cp -a fusionpbx /var/www/fusionpbx - Create a fusionpbx site for apache and enable it. Note that this makes fusionpbx appear at the root of your site. Create file called fusionpbx in your /etc/apache2/sites-available directory and put the following in it:
      <VirtualHost *:80>
        ServerAdmin webmaster@localhost
        ServerName freepbx.example.com
        DocumentRoot /var/www/fusionpbx
        <Directory />
                Options FollowSymLinks
                AllowOverride None
        </Directory>
        <Directory /var/www/fusionpbx/>
                Options Indexes FollowSymLinks MultiViews
                AllowOverride None
                Order allow,deny
                allow from all
        </Directory>
        ScriptAlias /cgi-bin/ /usr/lib/cgi-bin/
        <Directory "/usr/lib/cgi-bin">
                AllowOverride None
                Options +ExecCGI -MultiViews +SymLinksIfOwnerMatch
                Order allow,deny
                Allow from all
        </Directory>
        ErrorLog /var/log/apache2/error.log
        # Possible values include: debug, info, notice, warn, error, crit,
        # alert, emerg.
        LogLevel debug
        CustomLog /var/log/apache2/access.log combined
    Alias /doc/ "/usr/share/doc/"
    <Directory "/usr/share/doc/">
        Options Indexes MultiViews FollowSymLinks
        AllowOverride None
        Order deny,allow
        Deny from all
        Allow from 127.0.0.0/255.0.0.0 ::1/128
    </Directory>
</VirtualHost>
Then enable the site with
a2ensite fusionpbx/ - after installing FusionPBX, commit the entire configuration to git to make rolling back easier. Switch to a new branch before making further changes.
- set up a FQDN for the box running FreeSWITCH and FusionPBX
- use ACL to allow www-data to make changes to the /usr/share/freeswitch directory
And after you install and you realise it didn’t quite go as planned
- Reset the postgresql database:
root@fusionpbx: # su - postgres
postgres@fusionpbx:~$ psql
postgres=# drop database fusionpbx;
postgres=# create database fusionpbx;
postgres=# alter user fusionpbx with password 'XXXX';
grant ALL PRIVILEGES ON DATABASE fusionpbx to fusionpbx;
- revert your FreeSWITCH configuration using git
- revert your FusionPBX configuration using git