I want to write something in emacs to let me edit WordPress posts directly. There is of course the blogger-mode in emacs, but I’ve never managed to make that work. Then I noticed that JetPack in WordPress has a JSON interface. Supposedly it will let me do stuff to my blog via a REST interface.
What better way to learn something than try and learn 10 new things at once?! I mentioned my plan on #emacs and Nic Ferrier asked me to document the journey.
First thing is that your app needs to use oauth2 to authenticate. I tried the sample code given on wordpress.com. Before you can do that though, you need to log into wordpress.com and create an “app” and enable the JetPack JSON api module.
This results in:
auth: {"error":"invalid_request","error_description":"The required \"code\" parameter is missing."}

Catchable fatal error: Object of class stdClass could not be converted to string in /Users/jason/Dropbox/projects/emacs-wordpress/test.php on line 17
not very helpful. I then decided to see whats available in emacs. And low and behold Julien Danjou has written an OAuth 2.0 library for emacs. It’s available in ELPA in emacs >= 24
I downloaded and installed it no problems but the documentation lacks any kind of working example that I can see.
My first attempt was to run the oauth2-request-authorization function, but it required strange parameters. (oauth2-request-authorization AUTH-URL CLIENT-ID &optional SCOPE STATE
REDIRECT-URI) What the hell are scope and state?
Then looking through the source I found oauth2-request-access with a more promising (oauth2-request-access TOKEN-URL CLIENT-ID CLIENT-SECRET CODE
&optional REDIRECT-URI)
So I tried that: (oauth2-request-access "https://public-api.wordpress.com/oauth2/token" "XXXX" "longsecretcode" "CODE" "https://emacstragic.net" )
which returned [cl-struct-oauth2-token nil nil "XXXX" "longsecretcode" nil nil "https://public-api.wordpress.com/oauth2/token" ((error_description . "Invalid authorization_code.") (error . "invalid_grant"))]
That looks promising in a way. At least its doing something!
Stay tuned for part 2.
I recently migrated my linux box from bare metal hardware to a VMware virtual machine. At the same time, I upgraded from Debian squeeze to Debian Wheezy (testing).
After the dust had settled, one nagging problem keep recurring. Every time I did an aptitude update or aptitude install, after everything successfully ran, I would get this error message: Error: GDBus.Error:org.freedesktop.DBus.Error.Spawn.ExecFailed: Failed to execute program /usr/lib/dbus-1.0/dbus-daemon-launch-helper: Success
The cause of this proved quite difficult to track down. Eventually a Gentoo forum post led me to the solution. It seems that somewhere along the line, dbus-daemon-launch-helper has ended up with the wrong permissions. Change its permissions to be world executable. chmod o+x /usr/lib/dbus-1.0/dbus-daemon-launch-helper
During the emacs BoF at LCA2013 we decided to set up a mailing list for Australian users.
Ben has now set it up and it can be reached here: Emacs-au-discuss
I just got back from having an amazing week at LCA2013. That was my first LCA and I was really not quite sure what to expect. It turned out to be an amazing experience. I met so man really smart people, learnt a lot and generally got exposed to all sorts of new ideas and software.
Some of the highlights were:
If you are writing a complex regex search in emacs and need to edit the string, arrow keys takes you out of the search. M-e allows you to really edit the string.
I’ve been working on installing a watering system in my garden. Even though it seems simple on the surface, it took me a while to work out how to do things.
Part 1 – The Solenoid Valves and Manifold
First of all I sketeched out the garden beds I wanted to install the irrigation system into, and then I planned how many runs of dripper line I wanted. For the garden beds in question I needed two lines and three lines respectively.
The garden beds are on the side of our house with the closest water source being under the kitchen sink. I decided to install the solenoid valves and manifold under the kitchen sink. I put together my bill of materials and bought from Wet Earth who have been very helpful in advising me.
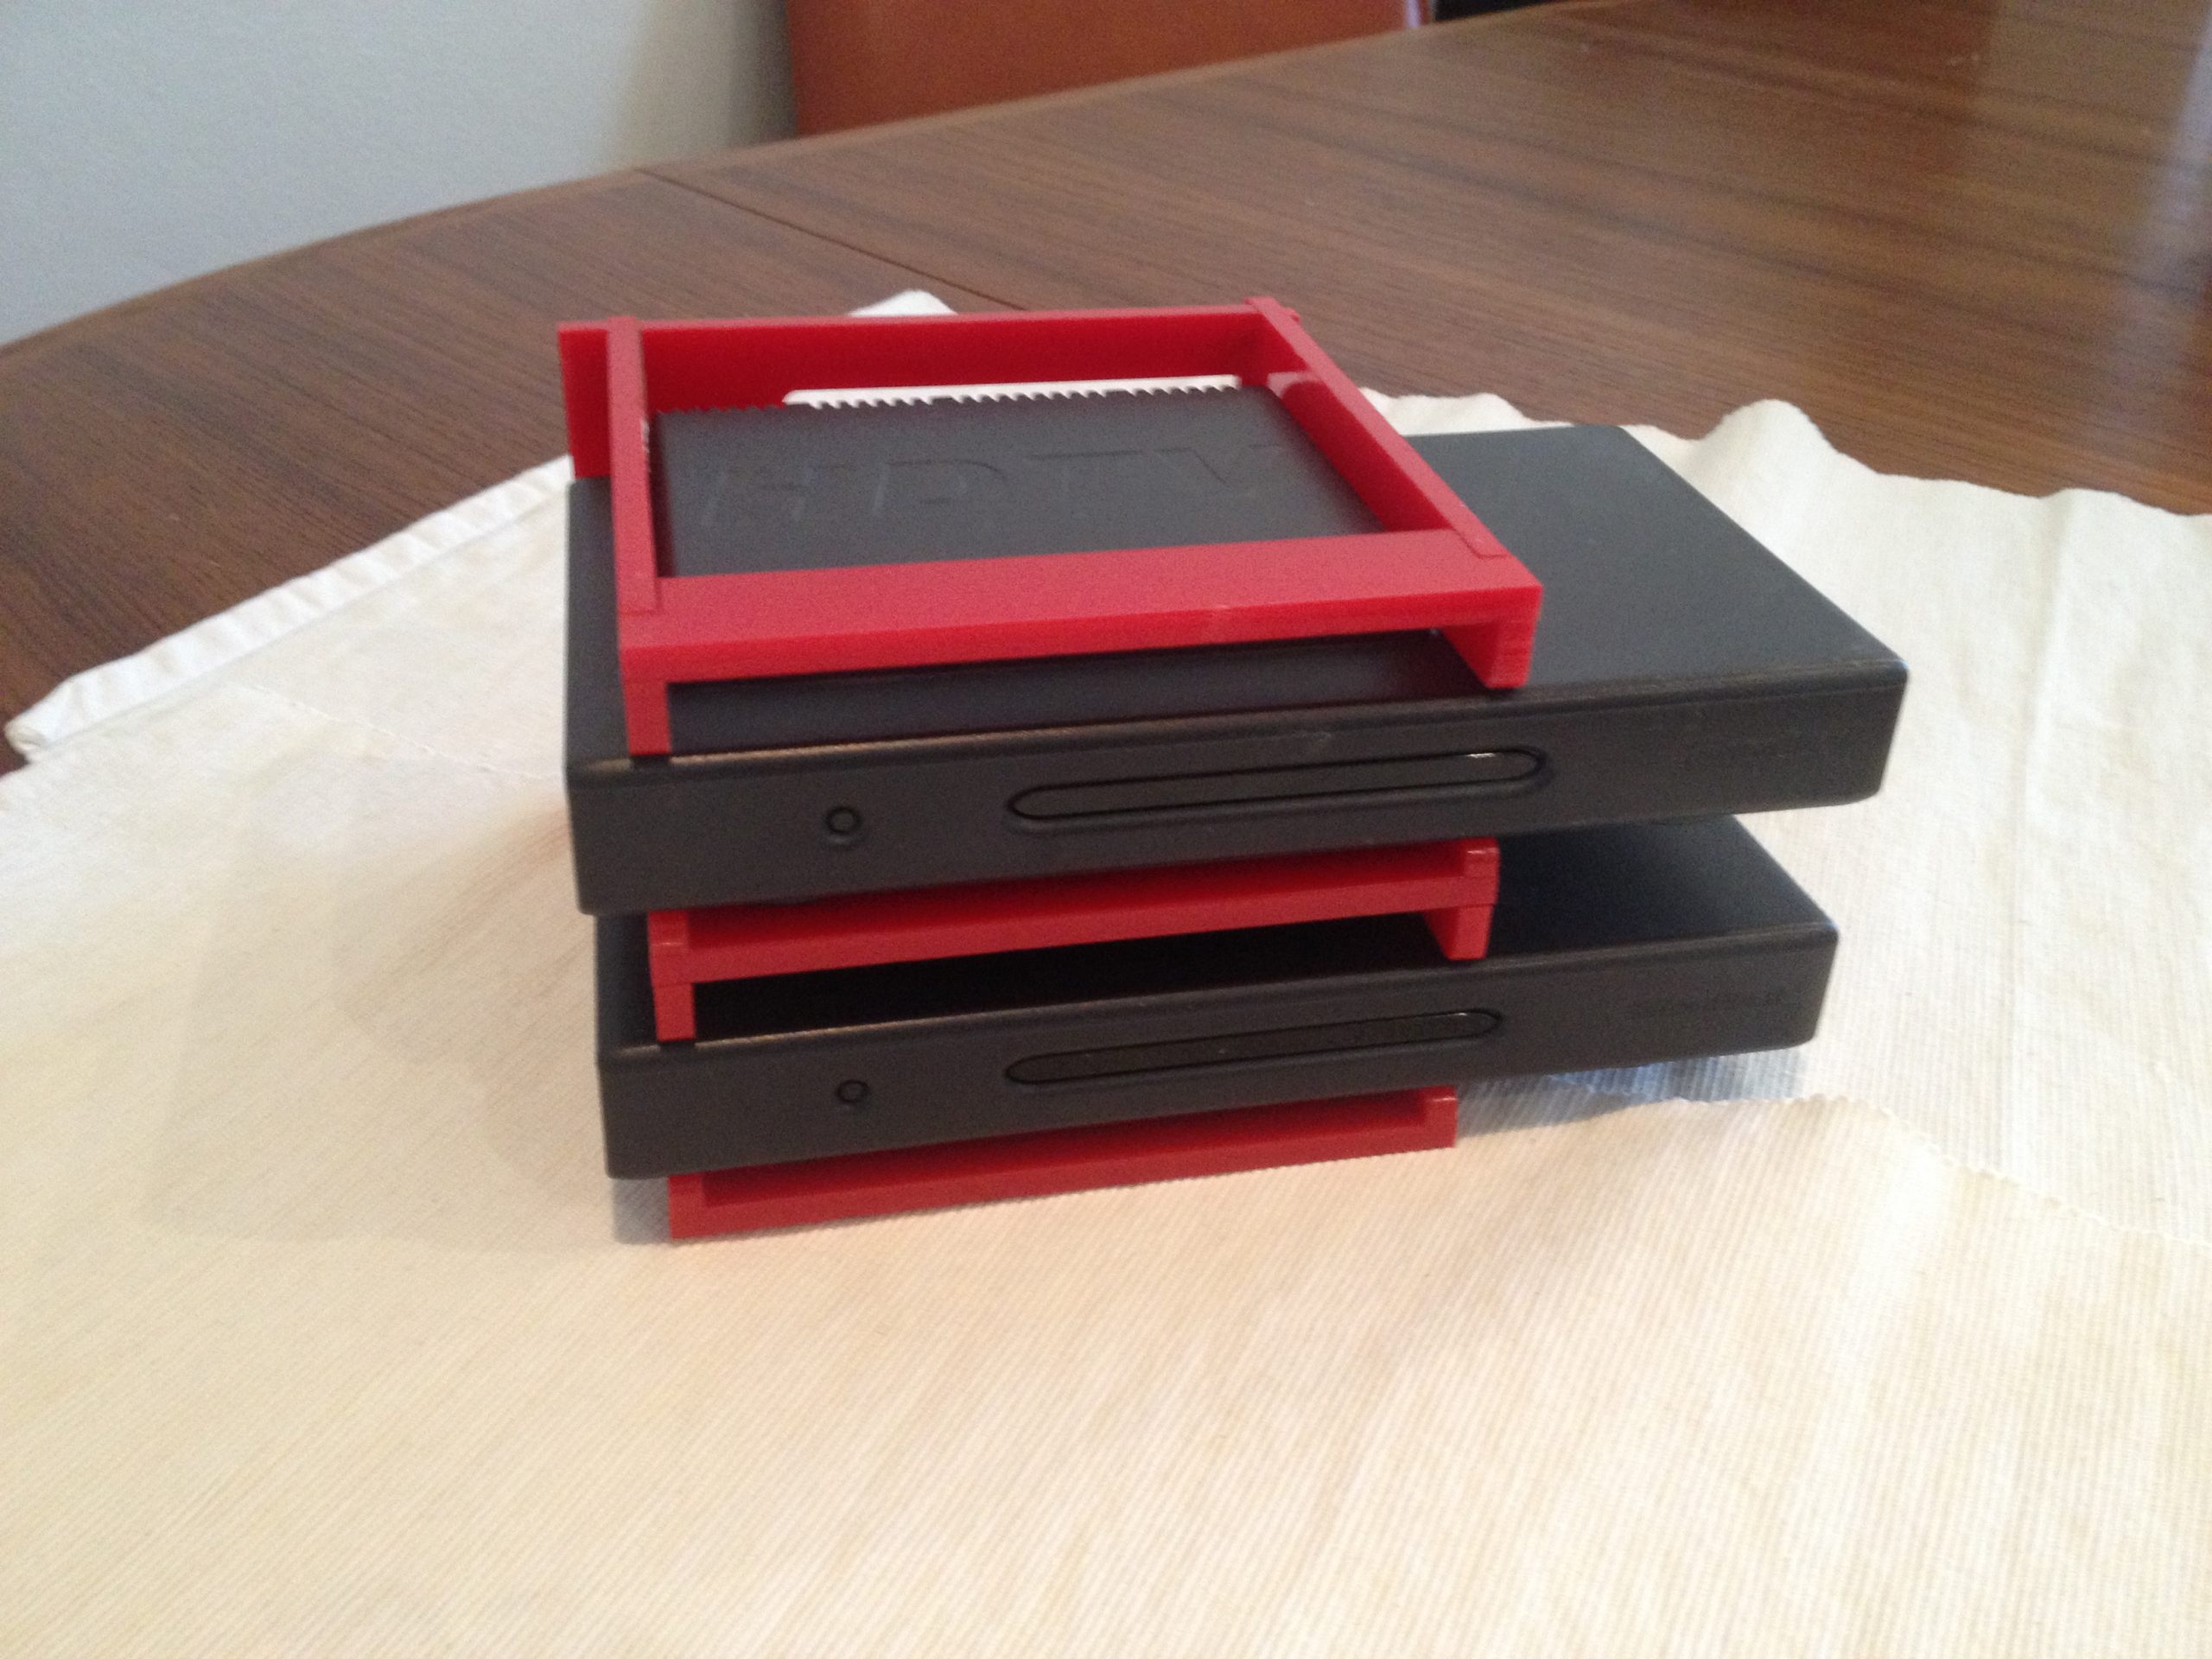
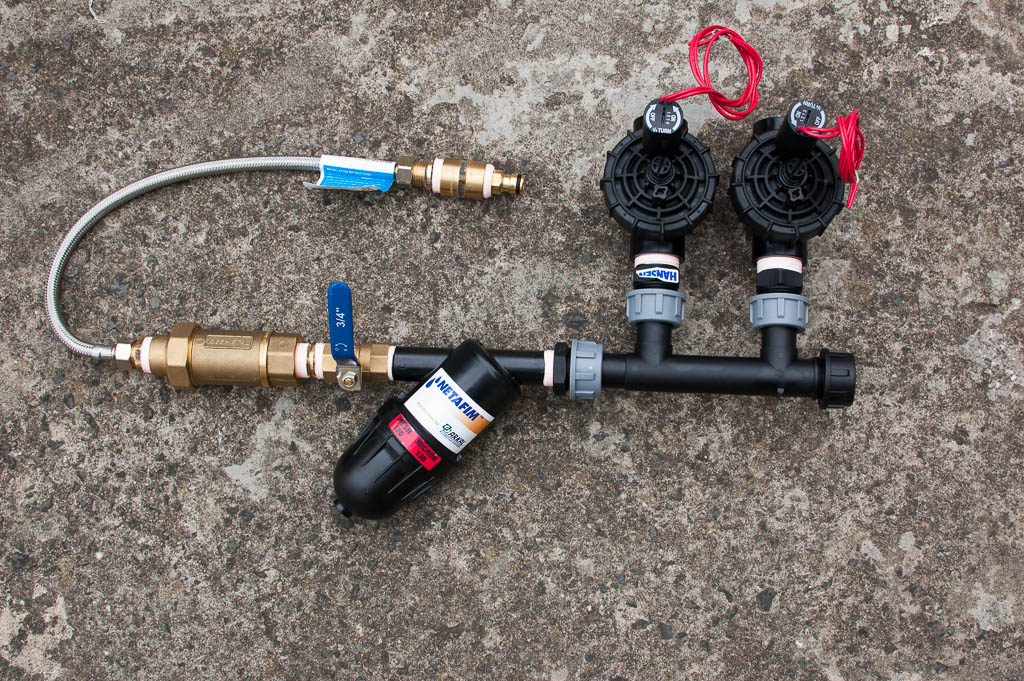
I measured the space available under the sink and put the pieces together to ensure they would fit. My first mistake was not testing the whole rig before installing. I found that it leaked and I spent a hours fiddling around under the sink trying to fix it. It was very difficult working under the sink and in the end pulled the whole lot out so I could test it all for leaks on the bench. I made a little test harness which you can see in the center of the photo below. It allowed me to connect the hose to the system and leave it pressurised to look for leaks. Solenoid Valves and Manifold and Filter
Starting from the top middle and following around anti-clockwise are:
Hose adaptor for testing purposes
Flexi hose.
Back flow prevention valve
Ball valve so I can turn the whole thing off if I need to.
Filter
Manifold
2 x Hunter Jar Top solenoide Valves
Under my sink there was already an unused tee in the cold water line. I’ll connect the flexi hose to that. I have heard that these flexi lines don’t last for ever and they need to be changed every 5-10 years or so.
The biggest problem I had was that all my threaded connections leaked. I was using plumber’s pink thread tape (the thicker stuff) but they still leaked. I asked at the pluming shop and was told that I should wind the thick tape twice around the thread before screwing them together, which I duly did, but it still leaked. I went back to the plumbing shop and asked more advice and was told that I should be wrapping the thread in 6-10 turns of the thick tape. Once I did that the seals were good. The guy at the irrigation shop told me to use 9 turns of thick tape, or 18 turns of thin on the black nylon glass re-inforced threaded fittings. This seems to be working well too.
After testing on the bench I finally managed to seal all the threaded connections only to find the valve heads were leaking, slow leaks but definitely leaking. I called Wet Earth and they told me to pull the head off the valve and ensure the diaphragms were clean. I did this and repressurised the system on my test harness. After leaving it at full presssure for several hours, and very slow drips coming out of the valve heads, it eventually seemed dry up. I suspect there was water in the thread or between the diaphragm and the head of the collar of the valve that was slowly dripping out making me think it was leaking, but the water eventually dried up and thats why I think it was just water in the thread.
I was using spanners for working on the various bits but then I got some molegrips and I have found these to be much better for the job. Much quicker to get parts on and off. Also molegrips open up mich wider. My 10″ shifter wasn’t wide enough for the nyglass fittings.
Part 2 – Dripper Lines
I made the ends for the dripper lines on the bench. For each bed I needed a head which would consist of 2 elbows, a tee for the water inlet and a vacuum break, and a tail consisting of 2 elbows, and a automatic flush valve. I measured up the 13mm poly tubing and put it together. I started out using hot water to warm the pipe to make it easier to insert the barbed fittings but then I had the idea of using the heat gun. The heat gun is much easer. I also found that the 13mm poly tubing was quite easy to straighten by using the heat gun to warm a section of pipe, and then holding it straight while it cools. It makes things slightly easier to work with, not having the pipe bending all over the place. It is easy to overheat the poly pipe with the heat gun though so you do have to be careful with it.
I laid the dripper line in the beds and hooked up the head and tail ends I made earlier. Incidentally I found the mole grips were also very good here for squeezing closed the poly pipe clips. Drip Line and Flush Valve
Above you can see three dripper lines (the middle one is a bit obscured) and the round automatic flush valve. The pipes are held in place with retaining pins. They are useful for holding things in place as you lay the pipes and connect things up. I spaced the lines 25cm appart in this bed. The drippers are spaced at 30cms in the dripper line. Three Dripper Lines
Vacuum Breaker and distribution into the dripper lines
Above you can see the vacuum break valve and the way I ran the 13mm poly pipe to the dripper lines. In hindsight I could have probably made that quite a bit neater if I had used a 4 way cross splitter. 13mm Poly pipes coming through the kitchen wall
13mm Dripper lines
Flush Valve and a tap I added to ease manual flushing of the lines
Part 3 – The Controller
I have long wished for a web interface based watering system controller. I finally found what I was after in OpenSprinkler by Rays Hobby. It is an arduino based sprinkler controller that is fully open. Software and hardware designs are fully available. I ordered one as soon as it was announced and Ray was very helpful in sending it out to me. I was perhaps a little hasty though as I have v1 of the board and its now up to v1.4. From what I can see the main benefits are that the newer board has a better way of connecting the Solenoid terminals so you can easily connect and disconnect the whole lot. I’ve also been experiencing stability issues with my controller. It seems to hang on power on most of the time and only successfully boots ones every 10-20 power cycles. I’ve not yet had time to look into solving those problems.
The controller lacks a battery backup so once you lose power, you have to re-load the configuration again. Ray came up with a hack to add external battery backup but its not very elegant. More recent versions have built in FTDI so you can program it directly from your computer. Mine requires an ISP programmer to program it and its a bit fiddly to do.
I have just noticed that the new boards store all settings in the firmware so yet another reason to consider upgrading.
The video of the 1.4 version seems very good. Especially the ability to manually turn on and off stations which I imagine will be very good for testing.
I’ll post an update when I make more progress on this project.
Each time you mark with C-<SPC>, Emacs saves the mark in the mark ring.
You can step back through your mark ring with C-u C-<SPC>.
You can swap point and mark with C-x C-x.
Emacs-lisp mode indents comments based on the number of semi-colons prefixing them.
One semi-colon indents to column 40.
Two semi-colons indent to the same level as the block you are in.
Three semi-colons indent to wherever you place it and don’t move if you press <TAB>
;;; column:
;;;34567890123456789012345678901234567890123456789
                                        ; one semi-colon
(when (some case)
  ;; two semi-colons indents to the appropriate level
  (second line)
  )
;; two semi-colons indents to the appropriate level
      ;;; I want this comment to stay right here